
The most important tag that backend developers must know well is the form tag. In this part we look at it in different situations, with useful examples.
One of the simplest forms is the search form. To have a search form, make a file with the name search.html and put the code below in it.
<form>
  <input />
  <button type="submit">search</button>
</form>If you open this file in the browser, the output is like the picture below.

If you type something in it and click on the search button, a question mark is added to the end of the page address. This means that the form understood that you are looking for something, but it did not understand what you are looking for.

To solve this problem, change the code like below.
<form>
  <input name="search-for" />
  <button type="submit">search</button>
</form>Now if you search again, you see something like the picture below. This means that the form understood that you are looking for something with the value test. Now this form sends search-for=test to the server.

With one more step, we can make this form a little better. Just change the code like below, so a helping value is shown inside the search field.
<form>
  <input name="submit">search</button>
</form>This value is shown in the form like below.

Now we have a form that sends the input value to the backend with the name search-for every time we submit it.
Make a file with the name login.html and put the code below in it.
<form>
  <label>username:</label>
  <input>

  <label>password:</label>
  <input>

  <button type="submit">Login</button>
</form>Now open the file in the browser. The output is like below. This is the simplest way to make a login form.

The look of this form is not very nice, because usually the username and the password fields are put under each other. For this, we put the fields inside the tag div.
<form>
  <div>
    <label>username:</label>
    <input>
  </div>

  </div>
    <label>password:</label>
    <input>
  </div>

  <div>
    <button type="submit">Login</button>
  </div>
</form>Now if you refresh the browser, the form is like below. Now its look is a little more acceptable.

Now if you write the username and the password, the output is like below.

The problem of the form in the picture above is that it shows the password. This is not correct for security. Now we solve this problem by changing the form like below.
<form>
  <div>
    <label>username:</label>
    <input>
  </div>

  </div>
    <label>password:</label>
    <input type="password">
  </div>

  <div>
    <button type="submit">Login</button>
  </div>
</form>In the code above, by putting type="password" we told html that this field is a password field and the text inside it must not be shown. Now if you refresh your browser and write the username and the password again, the output is like below.

If you click on the Login button, you see that nothing special happens and only a question mark is added to the end of the page address.

Now we add the name attribute to the form like below.
<form>
  <div>
    <label>username:</label>
    <input name="username">
  </div>

  </div>
    <label>password:</label>
    <input type="password" name="password">
  </div>

  <div>
    <button type="submit">Login</button>
  </div>
</form>Now write the username and the password again and click on the Login button again.

This time you see that the username and the password that we wrote are added to the page address. This means that putting the attribute name on the fields sends their information to the backend when we submit the form.
But there is still a big problem. The username and the password are important fields and their information must not go into the page address, because there anybody can see it and steal it easily.
To stop sensitive information from being shown in the page address, we must tell the form tag to send this information with the method post. For this we only change the code like below.
<form method="post">
  <div>
    <label>username:</label>
    <input name="username">
  </div>

  </div>
    <label>password:</label>
    <input type="password" name="password">
  </div>

  <div>
    <button type="submit">Login</button>
  </div>
</form>Now:

Right now this form sends its information to the same address. This means that if we want to take this information on the backend side, we must write a function (a view in Django) that waits for the information at the same address. If we want to send this information to another address, we only define the action attribute for this form and put the address that we want in it.
<form method="post" action="login">
  <div>
    <label>username:</label>
    <input name="username">
  </div>

  </div>
    <label>password:</label>
    <input type="password" name="password">
  </div>

  <div>
    <button type="submit">Login</button>
  </div>
</form>In the code above we tell the form to send the information to the login address.
One problem that this form still has is that the user can leave the username and the password empty and click on the Login button. We solve this problem with the required attribute.
<form method="post" action="login">
  <div>
    <label>username:</label>
    <input name="username" required>
  </div>

  </div>
    <label>password:</label>
    <input type="password" name="password" required>
  </div>

  <div>
    <button type="submit">Login</button>
  </div>
</form>Now if you do not fill the fields and you click on the Login button, the form is not submitted and an error like below is shown.

This form works well, but we can make the user experience better if we set the for attribute for the label and the id attribute for its field.
<form method="post" action="login">
  <div>
    <label for="username">username:</label>
    <input id="username" name="username" required>
  </div>

  </div>
    <label for="password">password:</label>
    <input id="password" type="password" name="password" required>
  </div>

  <div>
    <button type="submit">Login</button>
  </div>
</form>In the code above:
This gives us two good things:
Make an html file, put the code below in it and then open it in the browser.
<form method="post" enctype="multipart/form-data">
  <div>
    <label for="fullname">Full Name:</label>
    <input type="text" id="fullname" name="fullname" required>
  </div>

  <div>
    <label for="email">Email:</label>
    <input type="email" id="email" name="email" required>
  </div>

  <div>
    <label for="avatar">Profile Picture:</label>
    <input type="file" id="avatar" name="avatar" accept="image/*">
  </div>

  <button type="submit">Register</button>
</form>The output of the code above is like below.

In this form, for sending a file (the profile picture), we did the things below.
method="post" is set for the form.enctype="multipart/form-data" is set for the form.type="file" is set for that input.Without one of the things above, sending a file is not possible.
Also in this code, on line 14, the value accept="image/*" is set for the input. This means that when the user clicks on the choose file button, he can only choose image files. Below you see some of the most common types that you can use as accept.
| accept value | Use |
|---|---|
image/* | All image formats (jpg, png, gif, webp, …) |
image/jpeg, image/png | Only JPG and PNG images (the most common web formats) |
application/pdf | PDF file |
application/msword | Old Word file (doc) |
application/vnd.openxmlformats-officedocument.wordprocessingml.document | New Word file (docx) |
text/plain | Simple text file (txt) |
.pdf, .doc, .docx | A mix of extensions (the simplest way for office files) |
video/mp4 | MP4 video |
audio/mpeg | MP3 audio file |
Another thing that we must look at in this form is the email field. If you try to write something that is not an email and you click on the Register button, you see an error like below.

This happens because the value type="email" is set for it.
Imagine that we need a form that takes some phone numbers from the user. For this, make a file with the name phone.html and put the code below in it.
<form>
  <div>
    <label>phone 1:</label>
    <input name="phone">
  </div>

  <div>
    <label>phone 2:</label>
    <input name="phone">
  </div>

  <div>
    <label>phone 3:</label>
    <input name="phone">
  </div>

  <div>
    <button type="submit">Save</button>
  </div>
</form>Open it in the browser and fill the form. Then click on the Save button. The output is like below.

As you see, some phone values with different data are sent to the server. In this situation, if we use Django on the server side, to take the values we must use get instead of getlist. Below you see an example of backend code (django) that can take these values.
def save_phones_view(request):
phones = request.POST.getlist('phone') # ['123', '456', '789']Imagine that in one part of a shop site we need a form that takes the customer information and the delivery address. For this, make a file with the name customer.html and put the code below in it.
<form method="post">
  <fieldset>
    <legend>Customer Info</legend>
    <label for="customer_name">Name:</label>
    <input type="text" id="customer_name" name="customer[name]" required>

    <label for="customer_email">Email:</label>
    <input type="email" id="customer_email" name="customer[email]" required>
  </fieldset>

  <fieldset>
    <legend>Shipping Address</legend>
    <label for="address_city">City:</label>
    <input type="text" id="address_city" name="address[city]" required>

    <label for="address_street">Street:</label>
    <input type="text" id="address_street" name="address[street]" required>
  </fieldset>

  <button type="submit">Submit</button>
</form>If you fill this form, click on the Submit button and open the request that was sent to the server in the Network tab of the browser, you see something like below.

Here the behaviour of the backend technologies is different. For example, in php this information goes into an array.
$_POST['customer']['name']  // 'Ali Rezaei'
$_POST['address']['city'] // 'Tehran'But in Django the situation is different. By default Django does not change these brackets into a nested structure. You must parse it yourself, or use forms with a flat structure. This point is very important: the way you name the fields in HTML depends on your backend framework. the front-end sets the name values from what you expect.
Imagine that we want to save the information of a form in two ways.
For each of these ways we need one button.
To build such a form, make a file with the name index.html and write the code below in it.
<form method="post">
  <div>
    <label for="title">Title:</label>
    <input type="text" id="title" name="title" required>
  </div>

  <div>
    <label for="content">Descriptoin:</label>
    <textarea id="content" name="content" rows="6" required></textarea>
  </div>

  <div>
    <button type="submit" name="action" value="draft">Save as draft</button>
    <button type="submit" name="action" value="publish">Publish</button>
  </div>
</form>Now if you save the form with the save as draft button, the value draft and if you save it with the Publish button, the value publish is sent to the server. In this way, on the backend side we can choose a good strategy for saving.
Imagine that we want to give people the possibility to write a comment for the posts. For this we need a form that can say which user wants to write which comment for which post.
Now it is time to write the code of this form. For this, make a file with the name index.html and write the code below in it.
<form method="post">
  <input type="hidden" name="post_id" value="42">

  <div>
    <label for="body">Comment:</label>
    <textarea id="body" name="body" rows="4" required></textarea>
  </div>

  <button type="submit">Send</button>
</form>In the code above, on line 2, we made a hidden field that takes the id of the post itself and needs no action from the user. The value of this field, which is marked with value="42" is filled by the front-end developer. For this reason we make the type of this field hidden, so the final user does not become confused.
In this way we send the id of that post to the backend without the user seeing it.
By default the form tag sends the information as text, but to send a file we must send the file itself. Look at the code below.
<form method="post">
  <input type="file" name="my-file">
  <input type="submit">
</form>If you submit the code above, the name of the file is sent to the server.
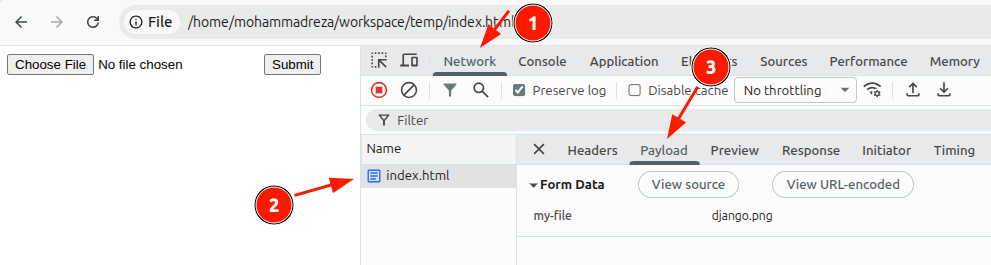
If you change this code like below, the file is sent as binary.
<form method="post" enctype="multipart/form-data">
  <input type="file" name="my-file">
  <input type="submit">
</form>In the picture below you see that the file is sent as binary, and this is the thing that we need.

In this part I tried to teach you how to use forms in practice, with some useful examples.
I upload all CodeBaz videos and podcasts on platforms such as YouTube and SoundCloud, which are often restricted in Iran.
Most tutorials come with both video and podcast formats. Therefore, if you want to make the most out of the site’s content, you will need to use a VPN.
Please note that for shopping in the store, it’s better to turn off your VPN to avoid issues with payment and banking connections.